2012-11-09
2010-06-15
Dinner June 15, 2010
 I woke up late today and today's suppose to be sewing day but I skipped and watch tons of movies instead. I snacked while watching which was obviously not a wise thing to do but hey, my second last day of the hols...Yet I know when Hobbit gets home he would probably be starving from work and tutoring and another tutoring after dinner. Yup...that's my husband. Long day everyday. So I decided to put on the wife's apron and cook him a simple yummilicious dinner. It's for two so one dish suffice.
 I rampaged through my fridge and found a pack of sayur manis, lots of chicken lap chiongs, onions and shitake mushrooms. At first I thought of making nasi goreng but heck my Indian movie was on hold and so...I just stir-fried all the ingredients with mushroom sauce and a bit of the steam fish sauce. Done! The man of the house was fed and I am happy! :)
2010-06-14
Sundy Lunch at Khun Churn
I know I haven't been good with updating this blog. Many times I said "I will" but the will power wasn't strong enough to move mountains. I am kinda lazy and free today so my time has been on the laptop almost half of the day. While browsing my picture folder, I noticed lots and lots of food pictures. So I guess it's time to get my hands/fingers on this page.

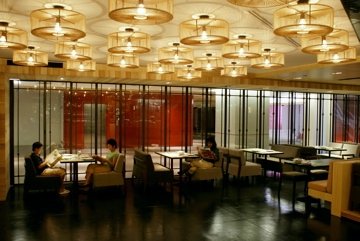
 pictures courtesy of KhunChurn's fb page
 Yesterday Hobbit and I had lunch at Khun Churn again. This is our second or was it the third time there. The food was so good and filling that we both skipped dinner. If you haven't heard of Khun Churn, it is a vegetarian restaurant located at a medical mall. I blogged about this place here. So, here's what we ate...

I ordered khao khluk kapi (comes in big servings)

Larb Esan (made of toufu since it's veg.)

Raw greens that comes with the larb

pineapple fried rice

Our favorite appetizer and I don't know the name still urgh!

To go there, here's the address:
Bangkok Mediplex Building
Ground floor, next to Ekamai BTS station.
Tel: 0-2713-6599 begin_of_the_skype_highlighting 0-2713-6599 end_of_the_skype_highlighting
Bangkok Mediplex Building
Ground floor, next to Ekamai BTS station.
Tel: 0-2713-6599 begin_of_the_skype_highlighting 0-2713-6599 end_of_the_skype_highlighting
2010-06-12
June Potluck at G&G
 Gwen and Glenn's relatives were here visiting the whole week and so they called for a potluck. Due to home church, we only prepared simple dishes --Sweet vegetables (sayur manis) and Sweet & Sour mackarel (yam phla ka pong).


2010-06-11
Lunch June 11, 2010
Lunch for the home alone. Had lots of lentils still in the container. Soaked a handful and stir-fried with onions and curry powder. Tasted good when spread over hot steamed rice! :)

2010-06-08
Dine at Hong Min, MBK
 It was the last day of school and we felt like doing something together and so Nok and I went to Mah Boon Krong to shop and check out some stuff. I was actually feeling under the weather but I went anyway. All I bought was 2 working shirts for Hobbit and nothing for myself. I know...such a goody-goody wife! NO. We were hungry and randomly went into Hong Min (if I'm not mistaken) for some Chinese cooking.
 dim sum #1
 dim sum #2
 crab meat in yellow curry
 fish maw soup for the sick me
The restaurant was not so busy when we stepped in but usually when I passed by any Hong Min restaurant after working hours or weekends, they are usually packed with people. For one reason, crab meat. Well, they provide good service, always checking on our table and standing close by just in case customers needed anything or want to re-order. Not too many on the dim sum selections though. We spent about 400+B for the above food we ordered including two bowls of rice. Both of us were satisfied with the food.
MBK center 3rd fl branch (near BTS entrance) 02-611-5643 begin_of_the_skype_highlighting 02-611-5643 end_of_the_skype_highlighting
2010-06-02
Dinner June 2, 2010
Had a long day at school and came home feeling hungry yet too lazy to cook. Noticed there's one more fish fillet in the fridge. Can't help but cook another round of fish curry for two. Went so well with rice and a couple of shows on tv!


2009-12-07
Rich Chocolate Brownies
It is a Monday holiday today in replacement of the King's birthday. I slept half of the day and sat in front of my laptop throughout until I thought of baking. So I took out a recipe from Brownie Recipes and started baking.
 It only took about 20 minutes to finish the heating and mixing process before we poured the whole mixture into the roasting tin and let it sit for about 30 minutes.
The brownies came out just nice. I have cut down the amount of sugar and added cream cheese to the recipe! Hobbit love it that he managed to gulp down 1/3 of what was in the tray! :)
2009-08-08


2009-03-11
Dee's Baked Chicken Fillet
We had a great feast last weekend thanks to our visitor friend Deanna. She used to visit us a lot before she started working. Now that work and study pretty much dominated her life in MC, Hobbit Husband and I really appreciate her occasional visit since we don't get to see each other so often anymore. Partially, thanks to the classes she had to attend here in Bangkok, which gave us more time to catch up with each other.
 When Dee started a blog sometime last year, she coined the word "cooking" as part of her blog title. Truthfully, I was quite amused for I rarely see her on apron, holding a spatula in one hand and a wok in the other! Thus, not to stop and judge at Cooking, I pursued the second word (Mis)adventures... Okay, it made sense...could mean between amateur, learning, leading to a pro...Perhaps I see it as her personal adventure towards accumulating a kitchen! Spices, sauces, cutlery, stove, oven, blender...
 I guess she started with one stove and soon her adventures brought her to owning a real kitchen!
 I was excited for her. Knowing that we could exchange kitchens and not only that, her visit actually brought extras to my own small kitch -- McCormick Italian Seasoning, Rosemary, and some other good stuff I wouldn't bother to buy! Yippee! :)
This visit, Dee came with her culinary skills along with a big appetite! We LOVED it!
So Hobbit and I were looking forward to try her Baked Chicken Fillet that she mentioned to us from Kim Ong's blog (I read and follow Kim Ong's blog too...such an inspiration for budding cooking dabblers like Dee and I). We started marinating the night before and baked it at lunch time. Here was the result!
 Nice aroma . In fact we added parmesan cheese to the crumbs just to add flavor. Although we couldn't get the exact bread crumbs, the marinate ingredients was the main stuff that made the fillet tasty. The three of us were very much satisfied with the end result but nevertheless thought there is always room for improvements on every first attempt! :)
Thanks Dee. Thanks for stopping by and shared with us while you're in the midst and enjoying your (mis)adventures. It was a pleasure to be your chef helper! I expect more to come!! *_*
Subscribe to:
Posts (Atom)